area
h4ck1n6
today : | at : | safemode : ON
> / home / facebook / twitter / exit /
name author perms com modified label
Tampilkan postingan dengan label windows. Tampilkan semua postingan

Install dengan Ghost 1 eko haddy rwxr-xr-x 0 20.14

Filename Install dengan Ghost 1
Permission rw-r--r--
Author eko haddy
Date and Time 20.14
Label
Action
Sudah lama saya baru menulis lagi, ini juga karena di beri semangat oleh Om kikin, beliau menyemangati dan mengajarkan saya untuk Berbisnis Online, Banyak hal yang sudah di ajarkan kepada saya, tapi yang paling terpenting adalah perbanyak Postingan, dengan kita secara rutin meng-update isi situs kita bisa memperbanyak Visitor yang berkunjung. :)
Pada kesempatan kali ini saya akan membagi Ilmu tentang "Cara Instalasi Sistem Operasi Windows Plus Aplikasi Dalam Waktu Kurang Dari 20 Menit". Sebenarnya Hal ini sudah banyak yang tahu, tapi karena berbagi itu indah, maka saya akan berbagi hal tersebut di sini.

Ada 2 Tahap pada tutorial ini;

1. Menyiapkan file master untuk Back Up Ghost
2. Menginstall dengan file Master Ghost yang telah di buat

Karena ada 2 tahap, maka saya akan membagi tutorial ini menjadi 2 Postingan, Pada Postingan kali ini akan di bahas bagaimana cara menyiapkan file master untuk Back Up Ghost.

Yang harus disiapkan :

1. Hiren's.BootCD.10.6 atau tipe terbaru juga bisa,
2. Laptop / Komputer yang baru saja di install dengan full aplikasinya tapi tanpa install driver,
3. HardDisk (min) 20 GB free space untuk penyimpanan file Master, (kalo bisa HDD External),

Tahap 1 Menyiapkan file master untuk Back Up Ghost

a. Siapkan 1 unit Laptop/PC yang telah terinstal OS dan aplikasinya tanpa driver dah wajib dalam keadaan bersih dai virus, file corrupt, trojan, dll.
b. Ekstrak file Hiren's.BootCD.10.6 ke sebuah directory (folder).

c. Jalankan Windows Menu.cmd maka akan seperti ini.

d. klik Menu -> Backup -> Ghost32*


e. Maka akan tampil seperti ini


f. Klik OK
g. Pilih Local -> Partition -> To Image


h. Pilih Harddisk dimana Sistem berjalan, biasanya terletak pada list pertama, klik OK


i. Pilih Partisi dimana Sistem kita berada, Pilih partisi Windows C:, klik OK


j. Pilih directory untuk menyimpan file Master ghost (disarankan di Harddisk external yang berpartisi FAT32), beri nama dan deskripsi lalu klik Save


k. Pada dialog box "Compress Image File?", pilih High


l. Pada dialog box "Proceed with partition image creation?", pilih Yes


m. Pada dialog box "Cannot Lock the Volume", Pilih Force Lock


n. Jika ada pesan Error, klik OK


o. Pada dialog box "NTFS Problem Detected", Pilih Continue


p. Maka Proses dimulai, 


q. Tunggu hingga proses selesai, dan klik Continue


Yaaa itulah Step by step membuat Master Ghost, File tersebut di gunakan untuk master Sistem + Aplikasi yang bisa digunakan untuk instalasi Laptop/PC. Tutorial ini berlaku untuk semua jenis Windows
Ada hal penting yang anda harus ketahui, yaitu tidak semua File Ghost cocok dengan semua Laptop atau PC, disarankan membuat 1 file Master Ghost untuk tiap-tiap Laptop/PC.

Untuk Cara Pemasangan Ghost bisa Anda lihat pada postingan saya berikutnya..

How To Replace Notepad in Windows 7 eko haddy rwxr-xr-x 0 19.50

Filename How To Replace Notepad in Windows 7
Permission rw-r--r--
Author eko haddy
Date and Time 19.50
Label
Action

It used to be that Notepad was a necessary evil because it started up quickly and let us catch a quick glimpse of plain text files. Now, there are a bevy of capable Notepad replacements that are just as fast, but also have great feature sets.

Before following the rest of this how-to, ensure that you’re logged into an account with
Administrator access.
Note: The following instructions involve modifying some Windows system folders.
 Don’t mess anything up while you’re in there! If you follow our instructions closely, you’ll be fine.


Choose your replacement
There are a ton of great Notepad replacements, including Notepad2, Metapad, 
and Notepad++. The best one for you will depend on what types of text files you open and 
what you do with them. We’re going to use Notepad++ in this how-to.
The first step is to find the executable file that you’ll replace Notepad with. 
Usually this will be the only file with the .exe file extension in the folder where you installed
 your text editor. Copy the executable file to your desktop and try to open it,
 to make sure that it works when opened from a different folder.
In the Notepad++ case, a special little .exe file is available for the explicit 
purpose of replacing Notepad.If we run it from the desktop, it opens up Notepad++ 
in all its glory.
sshot-1
Back up Notepad
You will probably never go back once you switch, but you never know. You can backup
Notepad to a special location if you’d like, but we find it’s easiest to just keep 
a backed up copy of Notepad in the folders it was originally located.
In Windows 7, Notepad resides in:
  • C:\Windows
  • C:\Windows\System32
  • C:\Windows\SysWOW64 in 64-bit versions only
Navigate to each of those directories and copy Notepad.
Paste it into the same folder.
If prompted, choose to Copy, but keep both files.
You can keep your backup as “notepad (2).exe”, but we prefer to rename it to “notepad.exe.bak”.
Do this for all of the folders that have Notepad (2 total for 32-bit Windows 7, 3 total for 64-bit).
Take control of Notepad and delete it
Even if you’re on an administrator account, you can’t just delete Notepad – Microsoft
 has made some security gains in this respect. Fortunately for us, it’s still possible 
to take control of a file and delete it without resorting to nasty hacks like disabling UAC.
Navigate to one of the directories that contain Notepad. Right-click on it and select Properties.

Switch to the Security tab, then click on the Advanced button.
Note that the owner of the file is a user called “TrustedInstaller”.
You can’t do much with files owned by TrustedInstaller, so let’s take control of it. 
Click the Edit… button. Select the desired owner (you could choose your own account,
 but we’re going to give any Administrator control) and click OK.
You’ll get a message that you need to close and reopen the Properties windows 
to edit permissions. Before doing that, confirm that the owner has changed to what you selected.
Click OK, then OK again to close the Properties window. Right-click on Notepad 
and click on Properties again.
Switch to the Security tab. Click on Edit….
Select the appropriate group or user name in the list at the top, then add a checkmark 
in the checkbox beside Full control in the Allow column.
Click OK, then Yes to the dialog box that pops up.
Click OK again to close the Properties window.
Now you can delete Notepad, by either selecting it and pressing Delete on the keyboard,
 or right-click on it and click Delete.

You’re now free from Notepad’s foul clutches!
Repeat this procedure for the remaining folders (or folder, on 32-bit Windows 7).
Drop in your replacement
Copy your Notepad replacement’s executable, which should still be on your desktop.
Browse to the two or three folders listed above and copy your .exe to those locations.
 If prompted for Administrator permission, click Continue.
If your executable file was named something other than “notepad.exe”, 
rename it to “notepad.exe”. Don’t be alarmed if the thumbnail still shows the old Notepad icon.
Double click on Notepad and your replacement should open.
To make doubly sure that it works, press Win+R to bring up the Run dialog box and
 enter “notepad” into the text field. Press enter or click OK.
Now you can allow Windows to open files with Notepad by default with little to no shame!
 All without restarting or having to disable UAC!

HACKING FACEBOOK Windows Version eko haddy rwxr-xr-x 4 19.49

Filename HACKING FACEBOOK Windows Version
Permission rw-r--r--
Author eko haddy
Date and Time 19.49
Label
Action
Wahhh akhirnya rampung juga.. sebenernya gue udah bikin tutorial ini versi BackTrack, tapi pada kaga paham... katanya, udaah banyak orang yang nunggu-nunggu tutorial ini..
Hacking Facebook melalui OS yang katanya OS paling friendly dan paling banyak orang pake, yup Microsoft Windows. tutorial ini berlaku di Windows XP.

okk, udah gak sabar yahh, langsung aja nii disiapin toolsnya kalo belom ada ya download dulu toolsnya, ini yang kita gunakan :
3. Notepad
4. Cookie Editor (add on Mozilla Firefox)

mari eksekusi...

1. Sniffing jaringan
- buka cain & abel klik tab Sniffer Lihat gambar


- aktifkan sniffing


- klik tanda + warna biru hingga muncul seperti ini


- lalu klik All host in My Subnet, klik OK
- tunggu hingga scanning selesai lalu klik tab APR


2. APR POISONING
- masih pada cain & abel klik tombol plus biru,
- klik salah satu host pada tabel yang di sebelah kiri
- kemudian pilih semua host pada tabel sebelah kanan


- klik tombol kuning untuk APR Poisoning


3. Buka Wireshark, sorting http.cookie
- pada Interface List pilih Network Interface eth0 untuk LAN (warnet) atau wlan0 untuk wireless (wifi)


- pada kotak Filter di bagian atas isikan http.cookie
4. Mencari paket http facebook


- pada cookie facebook klik kanan dan copy value
- paste pada notepad atau text editor lainnya..


5. Copy seluruh data cookie ke Cookie Editor
- buka Mozilla Firefox, klik tools pilih Cookies Manager+
- jika gak ada, klik add ons pada kotak search ketik cookie dan install.
- setelah itu masukan data cookie ke Cookies Editor.
- peraturannya jika pada notepad seperti ini,
datr =DG7hTkkF4313jq6_zznM5SmV;
maka untuk di cookie editor seperti ini.
Name = datr
Content = DG7hTkkF4313jq6_zznM5SmV
Host = .facebook.com
Path = /


- cara membaca cookie dimulai setelah sama dengan (=) dan berakhir sebelum titik koma (;).
6. Eksekusi
- jika sudah yakin semua cookie telah di masukkan,
- masukkan www.facebook.com pada address bar, tunggu dan nikmati yang terjadi.


7. Doorrr!!!
- jika anda lagi beruntung di kolom paling atas terdapat kolom email yang menyatakan bahwa anda belum memverifikasi facebook anda, dengan fitur ini anda bisa me-reset email dan password, tapi sayangnya ini jarang terjadi
- kalo anda sudah dapet akses Facebook, semuanya terserah anda, saya gak mau ikut campur (takut dosa :p)

8. Game Over
- bisa di pastikan kalo yang praktekin ini semua anak2 labil, facebook si korban jadi Game Over :p.

thanks to : blusp10it & reddragon

GHOST DRIVER eko haddy rwxr-xr-x 0 19.48

Filename GHOST DRIVER
Permission rw-r--r--
Author eko haddy
Date and Time 19.48
Label
Action
Kalo liat judulnya serem amaat, kata Ghost Driver itu bahasa Inggris, secara harfiah kalo diartikan perkata yaaa Ghost = hantu/setan/demit sedangkan Driver = supir jadinya Supir Hantu.... tapi bukan itu maksudnya... disini Ghost Driver itu adalah hanya sebuah Istilah yang berarti.

anda kalo memiliki Komputer Laptop atau Netbook pasti pernah Re-Install Sistem Operasi Windows, dan setelah install Ulang pasti di haruskan Menginstall driver milik peripheral yang menempel pada Gadget anda, kalo anda memiliki Driver Bawaan dari Motherboard yaa gak ada masalah, tapi bagaimana jika anda tidak memiliki Driver-driver tersebut???

saya punya Solusinya, dengan GHOST DRIVER kita bisa mengambil Driver-driver yang sudah terinstall di Gadget anda. Jangan lupa kalo, ceritanya anda ingin menginstall ulang hal ini harus dilakukan sebelum Install Ulang.


OKEY..! Langsung aja..

System Requirements:

a. Intel Pentium or AMD K5 Class CPU atau Lebih tinggi
b. 8mb Ram.
c. 10mb ruang Hard disk
d. Windows 9x/ME/NT/2000/XP/2003/Vista/2008/7

Recommended System:
a. Intel Pentium II or AMD K6 Class CPU.
b. 16mb Ram.
c. 35mb ruang Harddisk
d. Windows 9x/ME/NT/2000/XP/2003/Vista/2008/7.
e. koneksi internet

step-stepnya

1. klik Ghost Driver untuk Mendownload terlebih dahulu
2. Install Ghost Driver
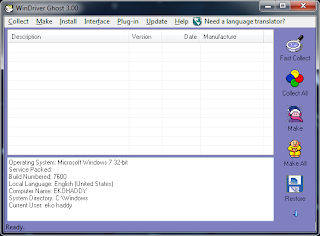
3. Buka Ghost Driver

berikut Keterangannya :
1. Mengumpulkan Informasi dari Hardware
a. klik tombol collect all untuk mendapatkan daftar semua driver yang terinstall di Sistem anda
b. klik tombol Fast Collect untuk mendapatkan semua Driver tapi tidak Microsoft Driver

2. Back up hanya Driver yang dipilih ke sebuah Folder
a. klik Fast Collect
b. pilih driver yang ingin di back-up
c. klik tombol Make,
d. pilih Folder tujuan lalu klik Start

3. Back up semua Driver ke sebuah Folder
a. klik Fast Collect
b. klik tombol Make All
c. dan kamu sekarang Mempunyai semua Driver Hardware yang ter-back-up

4. Backup the selected driver to an EXE Installer:
Choose from the menu ‘Make’->’Backup selected to EXE installer’

5. Backup the all the drivers to one EXE Installer:
pilih dari menu ‘Make’->’Backup all drivers to one EXE installer’

Membaca Partisi Linux di OS Windows eko haddy rwxr-xr-x 0 19.47

Filename Membaca Partisi Linux di OS Windows
Permission rw-r--r--
Author eko haddy
Date and Time 19.47
Label
Action
Tahukah anda bahwa Linux mempunyai Partisi sendiri yang compatible dengan dirinya? yapz, yaitu ext2, ext3, ext4..
jika anda tidak mengetahui tentang Linux saya yakin info ini tidak bermanfaat bagi anda,, tapi kalo anda mempunyai dual boot Windows dan linux, info ini saya yakin sangaat berguna banget.. :)

disini saya akan memberi tahu anda tentang tools pembaca partisi Linux di Windows,,, nama Tools ini adalah


ada yang udah pernah dengar tools ini??
kalo menurut saya tools ini berguna banget buat ngambil data dari Partisi Linux, dari pada anda harus merestart Laptop ada dan memakan waktu ga cukup 5 menit :) mendingan anda pake tools ini.. kalo mau sedot ini tools monggo klik disini.


http://area-hacking.blogspot.com
© 2012 `ekohaddy